
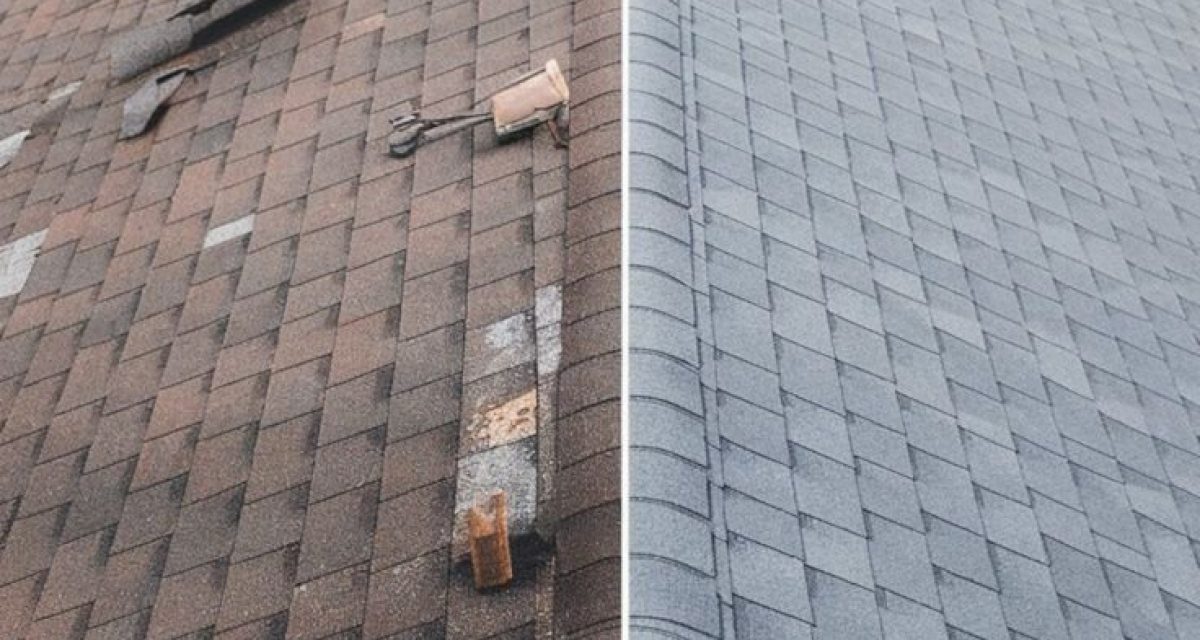
A Clear Before-and-After Roof Transformation
A roof can change the entire appearance of a home.
The project shown in this photo is a strong example of how dramatically an aging roofing surface can be transformed through professional roof replacement. The left side shows an older asphalt shingle roof with visible wear, discoloration, damaged-looking areas, exposed roofing details, and an overall surface that has lost much of its original appearance.
The right side presents a completely different result.
The new roofing surface has a consistent color, clean shingle alignment, defined roof lines, and a much more uniform finished appearance. This type of before-and-after transformation demonstrates why replacing an aging roof is about more than simply changing shingles.
A properly planned roof replacement involves preparation, material selection, installation techniques, attention to vulnerable areas, cleanup, and a final inspection.
For homeowners considering a similar project, understanding the process can make it easier to recognize the difference between simply covering an old roof and completing a properly planned roofing project.
Why an Aging Roof May Need Replacement
Roofing materials are constantly exposed to weather.
Sunlight, rain, wind, snow, temperature changes, moisture, and seasonal weather conditions can gradually affect shingles and the components beneath them.
Over time, homeowners may notice:
- Curling or damaged shingles
- Missing roofing materials
- Dark or discolored areas
- Loss of shingle granules
- Repeated roof leaks
- Visible deterioration
- Sagging areas
- Aging flashing or roof penetrations
- Water-related damage
Not every roofing problem requires a complete replacement. In some situations, a targeted repair may be appropriate.
However, when deterioration is widespread or the roofing system has reached the end of its useful service life, a complete roof replacement may provide a more comprehensive solution.
All State Roofing & Chimney’s website explains that its roofing services include roof repairs and replacements, roof installation, roof leak repair, and emergency roofing.
Step 1: Professional Roof Evaluation
A successful roofing project begins before the first shingle is removed.
A professional evaluation helps determine the existing roof’s condition and whether repair, partial replacement, or a complete roof replacement is appropriate.
The inspection should consider the visible roofing surface as well as important components underneath and around it.
Areas that may require attention include:
- Existing shingles
- Roof decking
- Flashing
- Valleys
- Roof edges
- Ventilation components
- Penetrations
- Chimney areas
- Skylights
- Areas showing signs of moisture
The purpose is to understand what the roofing system needs before installation begins.
This is especially important because problems underneath an old roof may not always be obvious from the ground.
Step 2: Planning the Roof Replacement
Once the roof has been evaluated, the project can be planned around the property’s specific requirements.
Material selection is an important part of this stage.
All State Roofing & Chimney lists asphalt shingles, flat roofing, slate roofing, and metal roofing among its roofing options.
The appropriate material depends on factors such as:
- Roof design
- Existing structure
- Desired appearance
- Budget
- Weather exposure
- Maintenance expectations
- Long-term goals
The photo accompanying this article shows a new shingle roof with a clean, consistent appearance. Asphalt shingles are commonly selected for residential projects because they can provide a practical combination of appearance, performance, and installation flexibility.
A professional contractor should also explain the scope of work clearly before the project begins.
Step 3: Removing the Existing Roofing
The left side of the photo demonstrates why this stage can be important.
An older roof may contain years of weather exposure and visible deterioration. Removing the existing roofing allows the underlying system to be evaluated rather than simply covering potential problems.
During a roof replacement, old roofing materials are removed according to the project’s requirements.
This process can reveal conditions that were not visible before removal.
For example, the contractor may discover:
- Deteriorated decking
- Moisture damage
- Weak areas
- Damaged flashing
- Improper previous repairs
- Areas requiring additional preparation
The goal is to create a suitable foundation for the new roofing system.
Step 4: Inspecting the Roof Deck
The roof deck is one of the most important structural surfaces beneath the shingles.
New roofing materials should be installed over a properly prepared substrate.
If damaged sections of decking are identified, those areas may need to be addressed before the new roofing materials are installed.
This is one reason a complete roof replacement can involve considerably more work than what is visible from the street.
Homeowners usually see the shingles, but a roofing system includes multiple layers and components working together.
The finished appearance on the right side of the photo represents the final visible layer. Behind that clean surface is the preparation that makes proper installation possible.
Step 5: Preparing the Roof Surface
Preparation is a critical part of professional roofing work.
Before new shingles are installed, the roofing surface must be properly prepared according to the selected roofing system and applicable installation requirements.
Depending on the project, preparation may include:
- Addressing damaged decking
- Installing appropriate underlayment
- Preparing roof edges
- Installing or replacing flashing
- Addressing valleys
- Preparing penetrations
- Reviewing ventilation
- Ensuring the surface is ready for the new shingles
Good preparation helps the new roof perform as intended.
It also helps create the clean, uniform appearance visible in the finished side of the photo.
Step 6: Installing the New Roofing System
This is the stage where the transformation becomes visible.
The new shingles are installed in organized courses, creating the consistent pattern seen on the right side of the image.
Proper installation involves more than placing shingles on the roof.
The installer must pay attention to:
- Shingle alignment
- Fastener placement
- Courses and spacing
- Roof edges
- Ridges
- Valleys
- Flashing
- Penetrations
- Transitions between roofing surfaces
The objective is a roofing system that looks clean while also providing the intended weather protection.
All State Roofing & Chimney describes its roof installation service as being focused on long-lasting protection and durability.
Step 7: Attention to Roof Details
The large areas of shingles are easy to notice, but smaller roofing details can be equally important.
Roof penetrations, edges, valleys, flashing, and transitions require careful attention because these areas can be more vulnerable to water intrusion if they are improperly installed or maintained.
A professional roof replacement should therefore involve detailed work around these areas rather than focusing only on the main field of shingles.
This is particularly important around chimneys and other structures that intersect the roof.
Because All State Roofing & Chimney also provides chimney inspections and repairs, homeowners can address roofing and chimney-related concerns through the same contractor when both systems require attention.
Step 8: Final Quality Inspection
Once installation is complete, the project should be carefully reviewed.
A final inspection allows the roofing team to look for incomplete areas, installation concerns, debris, or details requiring correction.
The finished side of the photo provides a good example of what homeowners typically want to see after a successful roofing project: consistent shingles, clean lines, an organized pattern, and a complete finished surface.
A final review can include checking:
- Shingle alignment
- Roof edges
- Flashing
- Valleys
- Ridge areas
- Penetrations
- Visible fasteners
- Cleanup around the property
Attention to these final details contributes to the overall quality of the finished roof replacement.
Step 9: Maintaining the New Roof
A new roof is a major investment, but installation is not necessarily the end of the homeowner’s responsibility.
Regular inspections and maintenance can help identify potential issues before they become larger problems.
Homeowners should pay attention to:
- Missing or damaged shingles
- Accumulated debris
- Damaged flashing
- Gutter problems
- Signs of water intrusion
- Moss or organic growth
- Changes around roof penetrations
- Storm-related damage
After severe weather, a professional inspection can help determine whether the roofing system has sustained damage.
Maintenance is particularly useful because small problems can sometimes become more complicated when left unaddressed.
Why Professional Workmanship Matters
The difference between the two sides of the photo is visually obvious.
However, the real value of a roof replacement is not limited to appearance.
Professional workmanship involves decisions and installation details that may not be visible once the project is finished.
A quality roofing project should consider the entire system, including preparation, materials, installation, flashing, ventilation, safety, and final inspection.
All State Roofing & Chimney states that it is licensed and insured and offers free in-house estimates, while its website lists roof repair, roof replacement, chimney services, gutters, siding, skylights, and emergency roofing among its services.
For homeowners, asking detailed questions before work begins can help clarify what is included in the project and how the existing roofing system will be handled.
Roofing Safety Is Also Part of Professional Work
Roofing work involves elevated surfaces and significant fall hazards.
OSHA provides specific guidance for fall protection during residential construction and roofing activities. Its guidance discusses protective systems and safe work practices for activities including roof sheathing and weatherproofing.
That makes job-site safety an important part of professional roofing operations.
Workers should have appropriate training and use applicable fall-protection measures for the work being performed.
Homeowners should also avoid walking on their own roof to inspect problems unless they are properly trained and equipped. A professional inspection is generally a safer way to evaluate roofing conditions.
The Long-Term Value of a New Roof
A new roof can change much more than the appearance of a property.
The transformation shown in this before-and-after image illustrates several potential benefits:
Improved Appearance
The new shingles create a cleaner and more consistent appearance than the visibly weathered surface shown on the older side.
Better Weather Protection
A properly installed roofing system is designed to protect the structure from rain, wind, and other weather conditions.
Reduced Maintenance Concerns
Replacing an aging roofing system can address widespread deterioration rather than repeatedly repairing individual problem areas.
Increased Curb Appeal
A clean new roof can significantly change the visual presentation of a home.
Greater Peace of Mind
Knowing that an aging roofing system has been professionally evaluated and replaced can give homeowners greater confidence in the condition of their property.
What This Before-and-After Photo Shows
The most important message from this project is the difference that proper roofing work can make.
On the left, the roof shows clear signs of age and weather exposure. On the right, the new roofing surface presents a uniform, clean appearance.
This type of comparison is useful because it shows the result rather than simply describing it.
A professional roof replacement is a process that starts with evaluation and preparation and continues through installation and final inspection.
The finished roof is the visible result of all those stages.
Choosing the Right Roofing Contractor
Before beginning a roofing project, homeowners should ask practical questions.
Consider asking:
- Will the existing roof be completely removed?
- Will the roof decking be inspected?
- What happens if damaged decking is discovered?
- What roofing materials are being proposed?
- What areas of flashing will be inspected?
- How will roof penetrations be handled?
- What safety procedures will be used?
- Is the company licensed and insured?
- Is there a written estimate?
- What is included in the project cleanup?
- What maintenance is recommended after installation?
Clear communication can help homeowners understand exactly what they are paying for.
All State Roofing & Chimney provides free in-house estimates and lists roof replacement as one of its primary roofing services.
Final Thoughts: From an Aging Roof to a Clean New Surface
The before-and-after image used in this article tells a simple story.
The older roof on the left shows visible aging and deterioration. The completed roof on the right presents a clean, consistent and refreshed appearance.
That transformation is the purpose of a well-planned roof replacement.
From the initial evaluation and removal of old materials to surface preparation, new shingle installation, detail work, inspection, and cleanup, every stage contributes to the final result.
For homeowners considering a new roof, the most important step is to begin with a professional evaluation and a clear understanding of the existing roof’s condition.
All State Roofing & Chimney provides roof replacement, roof installation, roof repair, roof leak repair, emergency roofing, and chimney services throughout New Jersey.